Testing push notifications can be tricky, especially when an app has been released in the App Store. Luckily, there are lots of tools available to make this easier. Let’s look at how to set up and use two of them: Houston and Pusher.
A sample push notification
Push notification content is defined by a JSON payload. Here’s a sample payload:
{
    "aps" : {
   	 "alert" : "Testing push notifications in production",
   	 "badge" : 1,
   	 "sound" : "o.caf"
    },
    "foo" : "bar"
}
Depending on your feature requirements, your push notification payload may look more complex than this one.
Setting up your environment
Before you can test push notifications, there are a couple of things you’ll need: your device’s push notification token and your app’s push notification certificate.
- Get your device’s push notification token. Depending on how your Services layer is set up, this means either a lookup on your API endpoint, or a ping to your DB admin to ask them to find it.
- Acquire the APNS production certificate and private key. This will usually be a .p12 file that’s password protected and shared securely among your team members. (This is also a good time to check with your System Admin and make sure the .pem file they were provided had the private key attached. Apple will consider the .pem file invalid without it.) The APNS Sandbox certificate is reserved for working with push notifications in your development environment.
- Open the production certificate in Keychain and verify the private key is attached. Double-click the .p12 file and it should open in Keychain automatically.
- Use the command line to convert your .p12 into a .pem file:
$ openssl pkcs12 -in cert.p12 -out prod-cert.pem -nodes -clcerts
This command assumes you have openssl already installed. Source.
Testing push notifications using Houston
If you’re comfortable working in the command line, Houston is a powerful and sleek way to test your push notification system with a single command.

Houston is a simple [Ruby] gem for sending Apple Push Notifications. Pass your credentials, construct your message, and send it.
- Install Houston.
gem install houston - Copy and paste the code found under the Usage section in Houston’s readme into a text file. Save as… a ruby file, e.g.:
houston.rb - Add configurations to your ruby file. Add the correct device token and path to your .pem file, and customize the message at a minimum. For added fun, reference your custom notification sound (if you have one). Then save the file. See below for an example.
- Go to Terminal and run
ruby /path/to/houston.rb
Here’s an example of houston.rb configured for a WooCommerce new order push notification:
require 'houston'

# Environment variables are automatically read, or can be overridden by any specified options. You can also
# conveniently use `Houston::Client.development` or `Houston::Client.production`.
APN = Houston::Client.production
APN.certificate = File.read('prod-cert.pem')

# An example of the token sent back when a device registers for notifications
token = '<ce8be627 2e43e855 16033e24 b4c28922 0eeda487 9c477160 b2545e95 b68b5969>'

# Create a notification that alerts a message to the user, plays a sound, and sets the badge on the app
notification = Houston::Notification.new(device: token)
notification.alert = 'Testing push notifications in production using Houston'

# Notifications can also change the badge count, have a custom sound, have a category identifier, indicate available Newsstand content, or pass along arbitrary data.
notification.badge = 1
notification.sound = 'o.caf'
#notification.category = 'INVITE_CATEGORY'
#notification.content_available = true
#notification.mutable_content = true
#notification.custom_data = { foo: 'bar' }
#notification.url_args = %w[boarding A998]
#notification.thread_id = 'notify-team-ios'

# And... sent! That's all it takes.
APN.push(notification)
And if everything’s set up correctly, you should see…

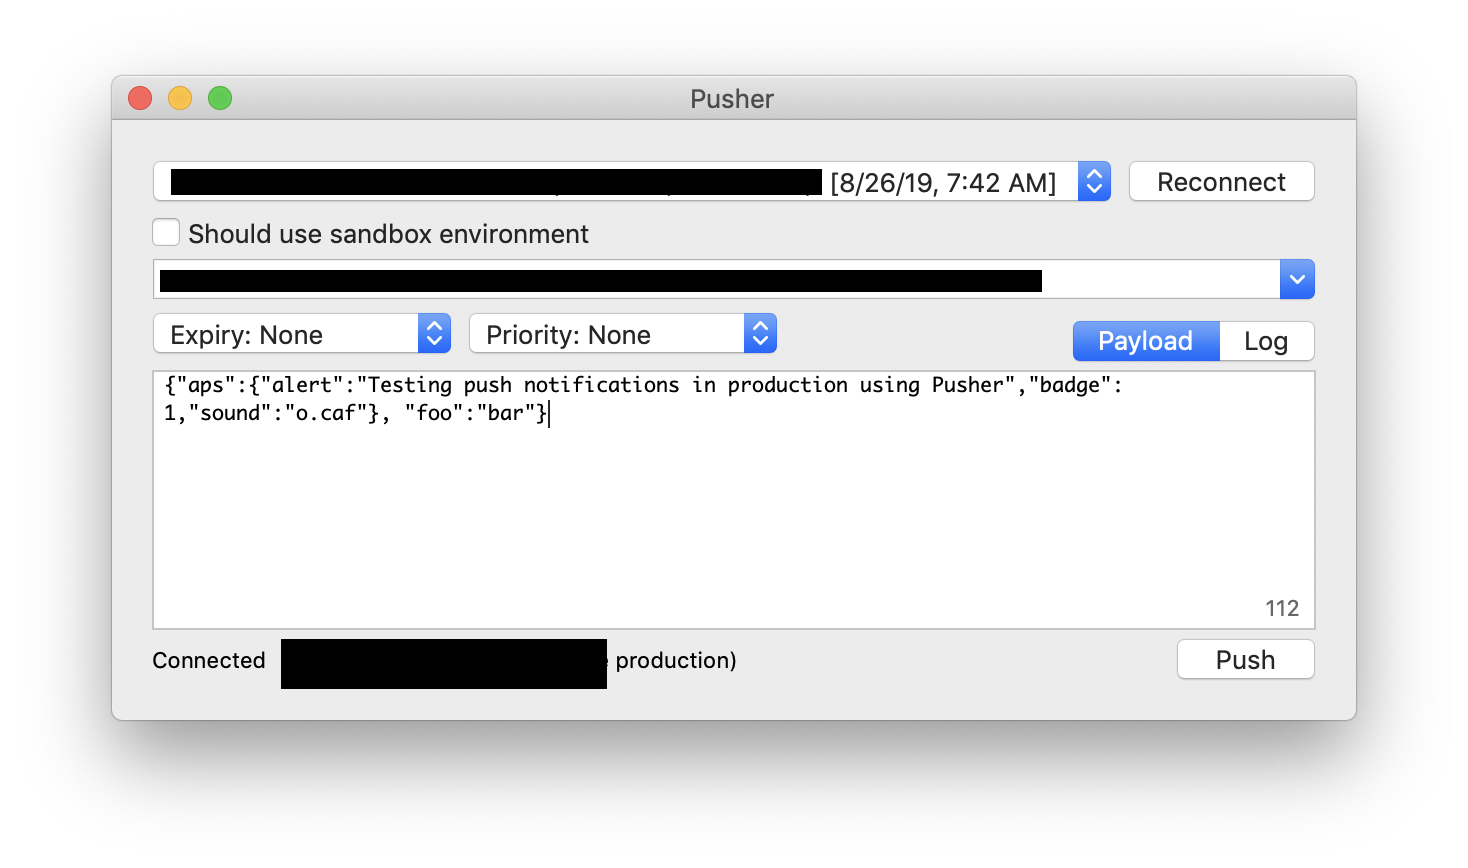
Testing push notifications using Pusher
If you prefer GUIs, Pusher is a small Mac utility with an all-in-one interface for organizing the many details required to send an Apple Push Notification. Yes, it has an unusual icon.

- Install Pusher.
brew cask install pusher(if you don’t already have Homebrew, go here to install it). Alternatively, you can download the latest binary straight from Github. - Go to Applications and right-click “Open Anyway” to open Pusher1.
- Configure Pusher. The Pusher interface is fairly straightforward. Select the drop-down menu and find your production APNS certificate. (You may be prompted for your admin username and password, so that Pusher can access the certificate from Keychain.) Note that Pusher can handle storing multiple device tokens in a nice drop-down menu.
- Add the push notification payload to the “Payload” text field.
- Select the “Push” button when you are ready to send.
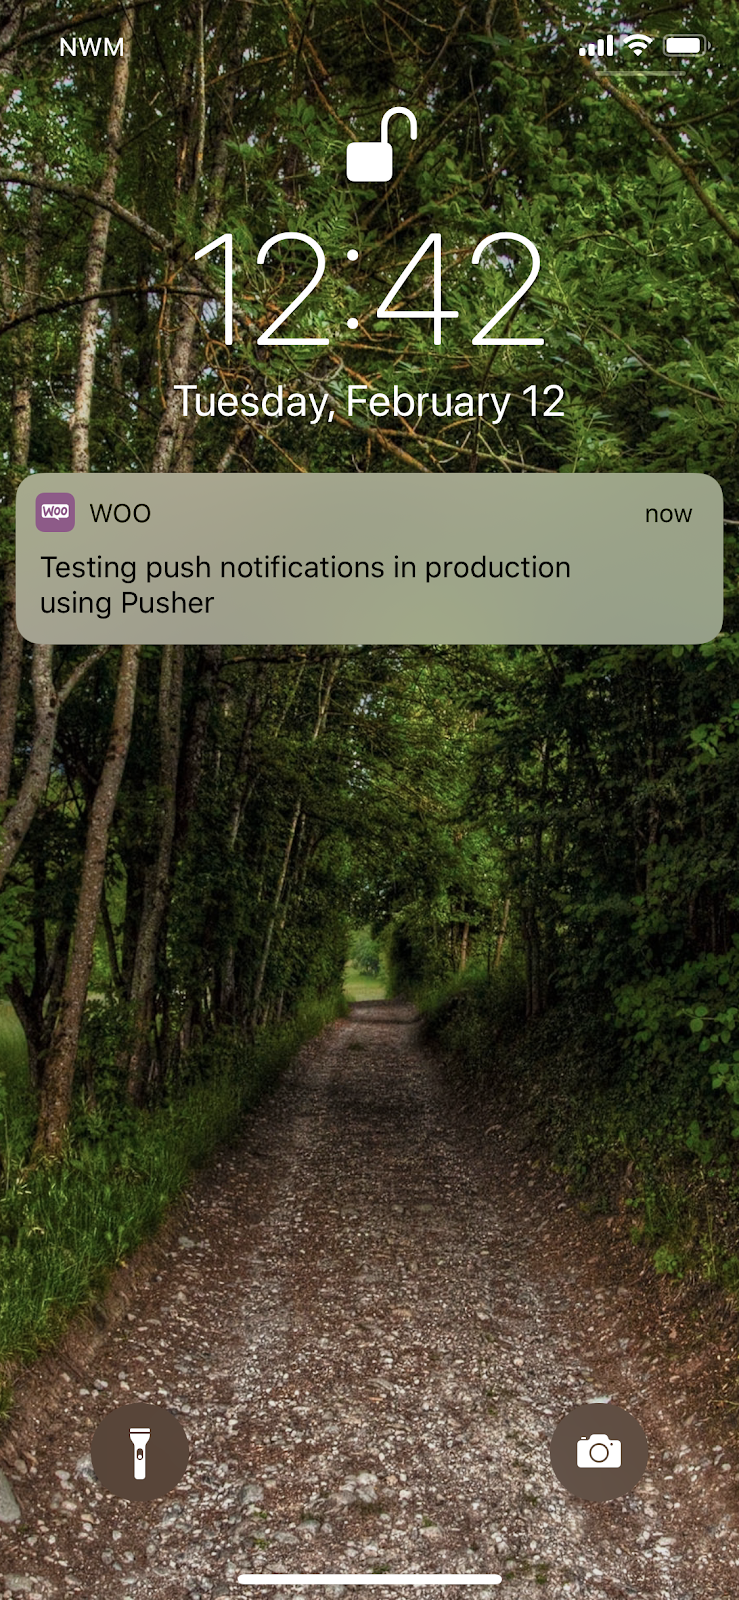
And if everything’s set up correctly, you should see…
Testing push notifications after setting up
In Houston, you can re-send the same push notification any time by opening Terminal and using the command ruby /path/to/houston.rb. To make edits to your push notification, open houston.rb in your favorite text editor. Save and run the command ruby /path/to/houston.rb to send it again.
In Pusher, you can re-send the same push notification any time by opening the Pusher app and selecting the “Push” button. To make edits to your push notification, edit the payload JSON inside of the “Payload” text field. To send the new push notification, select the “Push” button.
In Summary
Houston can send notifications with a simple command and doesn’t require in-depth knowledge for constructing complex payloads. Pusher finds your certificates for you and doesn’t require you to know how to define file paths, but does expect you to build your own payloads. Now that you have them set up, you can also use them for future work in your dev environment as well.
If you’d like to check out the apps, they’re available on the Google Play Store and the iOS App Store, and you can find all the code on GitHub.
1. If you attempt to simply launch the app, you will likely encounter this warning:
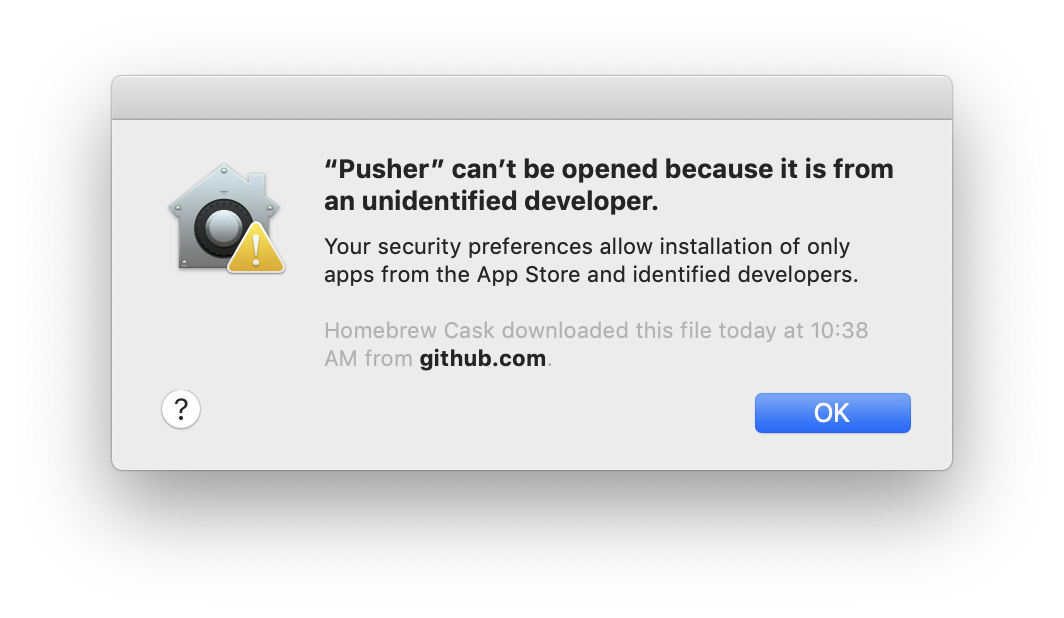
This is happening because you downloaded the app through terminal instead of the App Store. Either right-click the application and choose “Open Anyway” or go the the Apple menu > System Preferences > Security & Privacy and select the “Open Anyway” button.

Brew command is `brew install –cask pusher`
LikeLiked by 1 person
I am getting this error when I hit the push button
‘Unable to read: Read connection closed’
Why am I getting this error and how to resolve this issue?
LikeLike